Help center

Activities, lesson plans, live lessons and the Chrome extension, all in one place. Look anything up the moment you need it.

Getting started

How LessonBoard fits together

Four pieces, one live lesson.

LessonBoard puts short interactive activities — polls, quizzes, timers, questions — in front of your class during a live lesson, and collects their answers as they come in.

The dashboard
This website. Where you prepare: build activities, put them into lesson plans, and read the results afterwards. You can also run a whole lesson from here.
The Chrome extension
A side panel next to your video call. The remote control during a lesson — and it draws the board straight into your camera picture, so the class sees it without you sharing a screen.
The student page
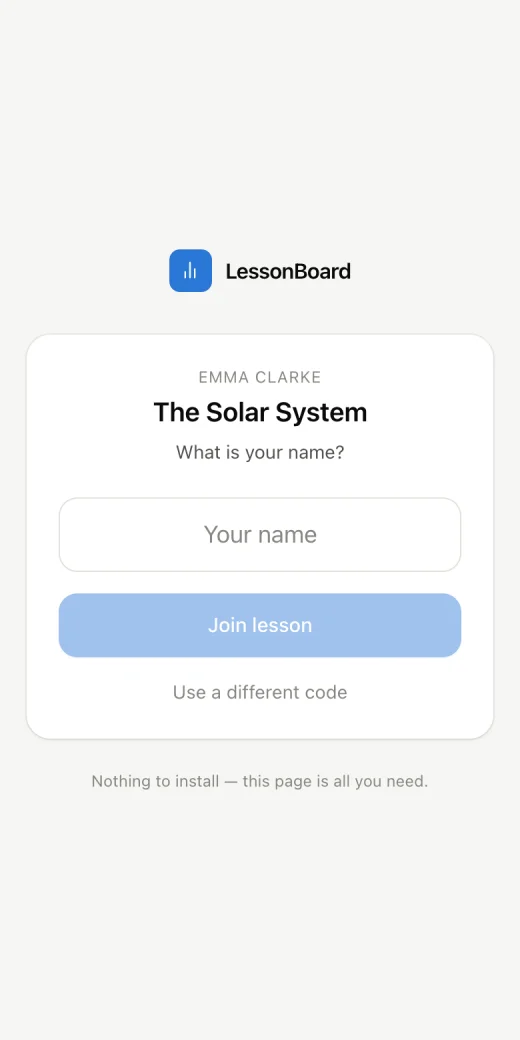
What students open on their phone or laptop. No account and nothing to install — a link or a six-character code, then a name.
The board
What the class looks at: the activity that is running and its live results. It can appear in your camera, in a shared tab, on a projector, and on every student’s own screen at once.

The words used throughout this guide:

Activity
One interactive item — a single poll, a single quiz question, a timer. See Activities.
Lesson plan
An ordered list of activities for one lesson. See Lesson plans.
Session
One lesson actually happening: it has a join code, students in it, and the answers they gave. See Starting a live session.

For the picture version, see How it works.

Getting started

Your first lesson in five minutes

The shortest path from nothing to a class answering a question.

  1. 1Open Lesson plans and press New lesson. Give it a name.
  2. 2In the plan, press New activity, pick Quick Poll, write a question and two answers, and press Add to lesson. Add two or three more the same way.
  3. 3Press Start live session. The board appears with a join code and a QR code on it.
  4. 4Show that to the class — in your camera with the extension, by sharing the board tab, or by pasting the link in the chat. Students open it and type their name.
  5. 5Click the first activity in the plan. It appears on the board and on every student’s screen, and the answers start arriving.
  6. 6Press Close answers when you are ready, then click the next activity. When the lesson is over, press End.
  7. 7Open Lesson sessions to see who answered what.

Want to see what students see? In a live session, press the Try as a student button above the board — it opens the student page in a new tab.

Activities

What an activity is

The building block of every lesson.

An activity is one thing you put on the board: a question with answers, a countdown, a task to discuss, a name picked at random. You set it up once — the wording, the options, how it behaves — and then launch it with a single click during the lesson.

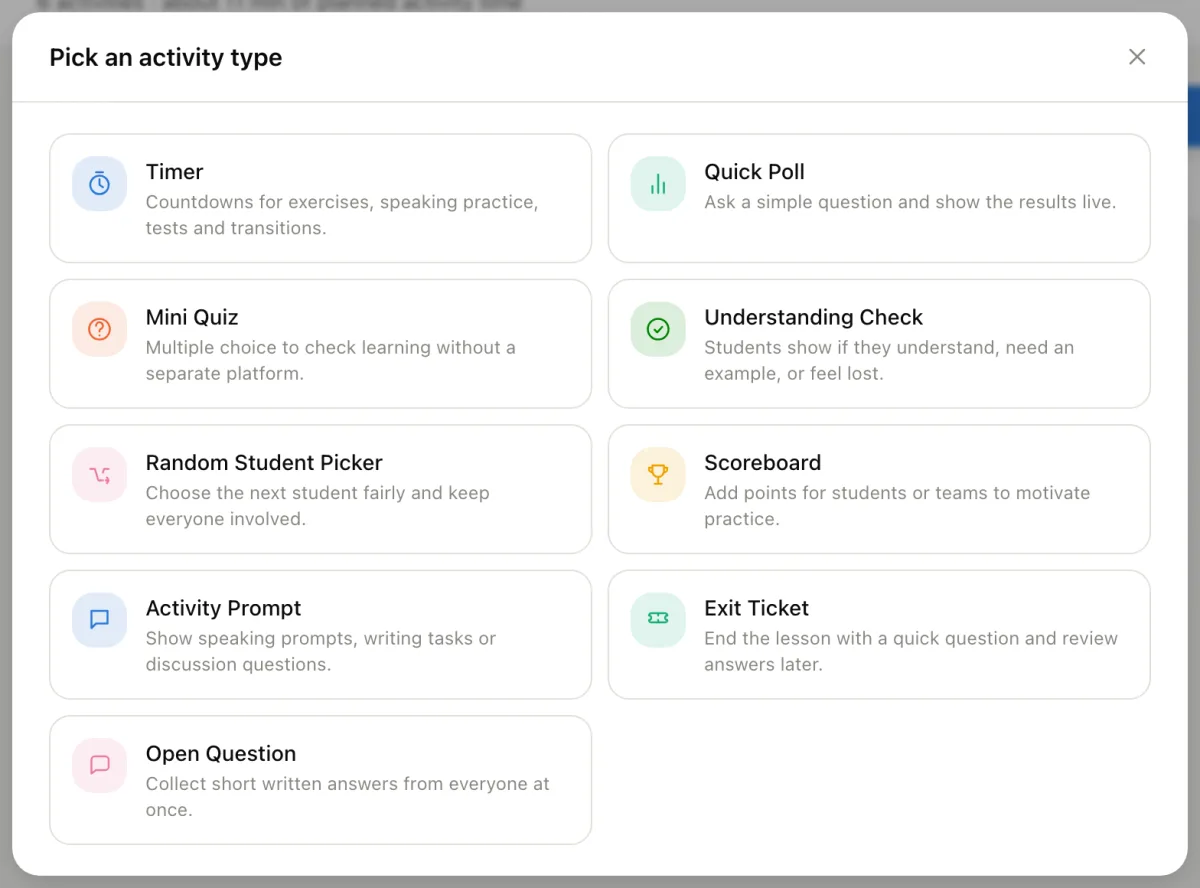
Every activity has a type, which decides what students see and how they answer. There are nine; see Activity types.

Activities live in two places:

The activity library
Your shelf of reusable templates. A good home for anything you use in more than one lesson — a standard “How are we doing?” check, a 5-minute speaking timer.
Inside a lesson plan
Each lesson holds its own copies. Taking something off the library shelf copies it into the lesson, so editing it there never changes the template or any other lesson.

Activities fall into two kinds:

  • Collect answers — Quick Poll, Mini Quiz, Understanding Check, Open Question, Exit Ticket. Students answer on their screens and results fill the board live. Every answer is saved for later.
  • Show on screen — Timer, Activity Prompt, Random Student Picker, Scoreboard. Nothing for students to answer; you drive them from your controls.
Activities

Activity types

What each one is for, what students see, and what you can set.

The “Pick an activity type” window listing all nine types with a one-line description of each
Pressing New activity asks for the type first.

Quick Poll

Ask a simple question and show the results live.

What students see

The question and a button for each option. Results appear on the board as bars that grow as answers arrive.

What you can set

  • Question and options — Two to six options.
  • Let students change their answer — On by default. Off means the first tap is final.

Best for: Opinions and preferences with no right answer — “Which topic next?”, “Did you do the homework?”.

Mini Quiz

Multiple choice to check learning without a separate platform.

What students see

The question and answer buttons, like a poll. With “reveal after stop” on, the correct answer is hidden until you close answers — then it is highlighted on the board and on every phone.

What you can set

  • Answers — mark the correct one — Two to six answers; tick the correct one.
  • Points if correct — Added to the student’s score the moment they answer correctly. Scores carry over into a Scoreboard.
  • Reveal the answer only after I stop it — Keeps the class from copying the leading answer. Recommended.

Best for: Checking that something has landed — vocabulary, a grammar rule, a fact from the reading.

Understanding Check

Students show if they understand, need an example, or feel lost.

What students see

Three coloured buttons — by default Clear, Not sure, Need help. The board shows how the class splits.

What you can set

  • Question and options — The wording can be changed; the first three options keep their green, amber and red colours.

Best for: A 10-second pulse check after explaining something, before moving on. The combined results also show on your Statistics page.

Open Question

Collect short written answers from everyone at once.

What students see

The question and a text box. Their answers appear on the board as they are sent.

What you can set

  • Placeholder — The grey hint inside the empty box.
  • Max length — How many characters a student may type, from 20 to 1000. 280 by default.

Best for: Short written production — “Write one sentence with the new word”, “What would you do?”.

Exit Ticket

End the lesson with a quick question and review answers later.

What students see

A closing question, answered either in writing or with a star rating.

What you can set

  • Answer format — Written answer (a sentence or two) or Rating (stars).
  • Highest rating — For ratings: the top of the scale, 3 to 10. 5 by default.

Best for: The last two minutes of a lesson — “What is one thing you learned today?”, “How confident do you feel?”. Read the answers afterwards in Lesson sessions.

Timer

Countdowns for exercises, speaking practice, tests and transitions.

What students see

A large countdown with your label above it. A sound plays when it reaches zero.

What you can set

  • Duration — Minutes and seconds, or one of the quick presets from 30 seconds to 10 minutes.
  • Label shown on screen — What the time is for — “Work on the task”, “Speaking in pairs”.
  • Start counting down as soon as I launch it — Off means it launches paused and waits for you to press Start.

During the lesson

Pause / Resume, Reset, and +1 min while it runs.

Best for: Timed exercises, speaking practice, tests and transitions.

Activity Prompt

Show speaking prompts, writing tasks or discussion questions.

What students see

A heading, your instructions, and a picture if you added one. Nothing to answer.

What you can set

  • Heading — The big line — “Discuss in pairs”.
  • Instructions — The task itself, as long as it needs to be.
  • Image — Optional. A phone photo is fine — it is shrunk before uploading.

Best for: Speaking prompts, writing tasks, discussion questions, a picture to describe.

Random Student Picker

Choose the next student fairly and keep everyone involved.

What students see

Your heading and the name that was picked, in large type.

What you can set

  • Heading shown above the name — “Next up…” by default.
  • Everyone gets a turn before anyone repeats — On by default. Only students currently in the lesson are picked.

During the lesson

Pick a student / Pick another student, and New round to put everyone back in.

Best for: Choosing who answers next, fairly, without always calling on the same people.

Scoreboard

Add points for students or teams to motivate practice.

What students see

A ranked table of names and points.

What you can set

  • Who is competing? — Students — everyone who has joined, starting from the points they already have. Teams — up to six fixed team names.
  • Points per tap — How much each + or − changes a score. 1 by default.

During the lesson

+ and − beside each name. Your list stays in a fixed order so rows do not jump under your finger; the board shows the ranking.

Best for: Games, competitions between teams, and keeping motivation up across a practice block.

Activities

Settings every activity has

Name
How the activity is listed in your library or plan. Students do not see it — they see the question or heading.
Time on screen
Every type except the Timer can show a small countdown beside the activity — Off, 30 s, or 1 to 5 minutes. It is only a guide for the class: nothing closes by itself. When it runs out the figure turns red and answers are still accepted until you close them.

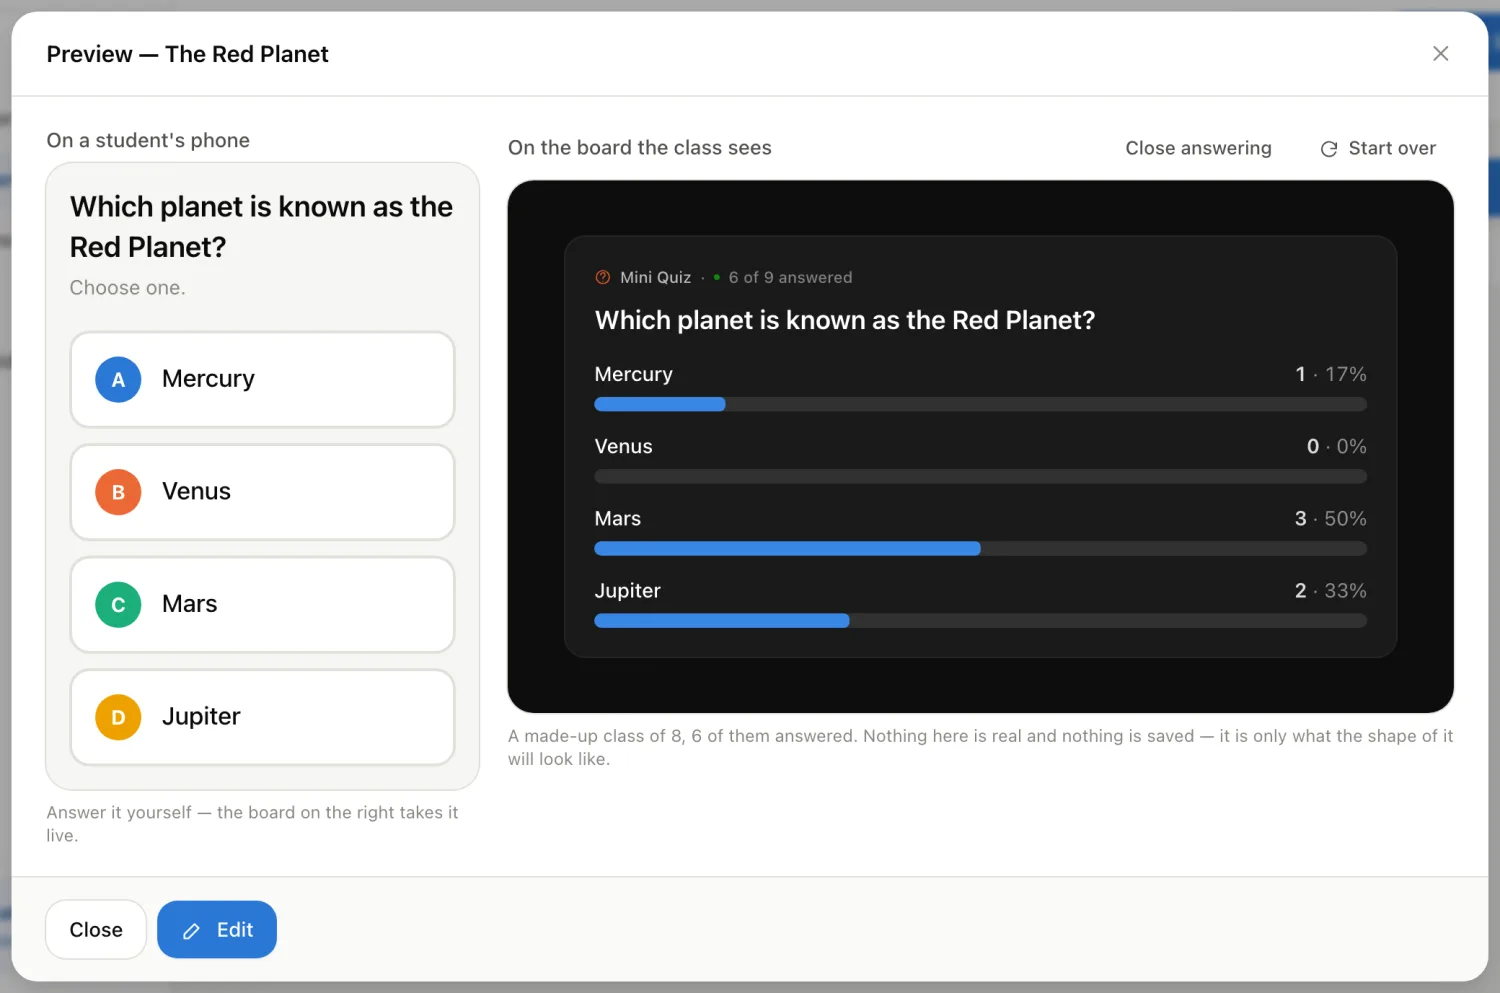
Not sure how it will look? The Preview button (the eye) on any activity in a plan shows it on a phone and on the board side by side.

Activity preview: the Mini Quiz on a student’s phone on the left, and the board with results on the right
Preview: the student’s phone on the left, the board on the right. Answer on the phone side to try it.

Activities

The activity library

Reusable templates you can drop into any lesson.

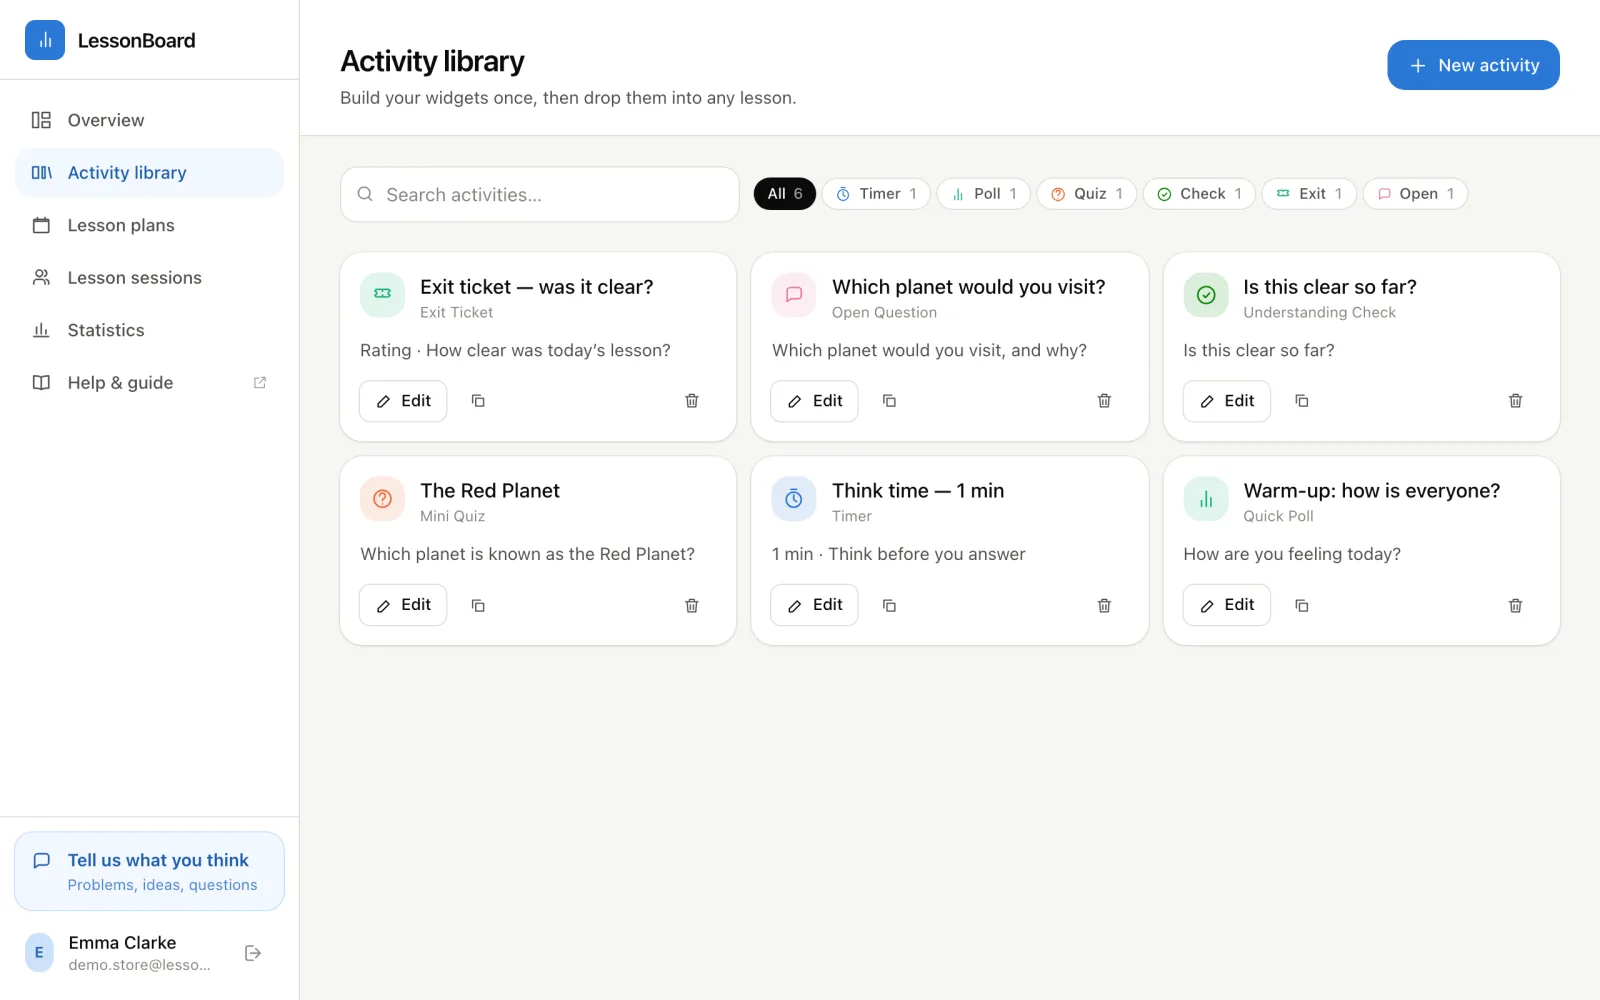
The Activity library page: a search box, type filter chips and a grid of activity cards with Edit, Duplicate and Delete buttons
  1. 1Open Activity library and press New activity.
  2. 2Pick a type, fill in the form, and press Add to library.
  • Search by name and filter by type with the chips above the list.
  • Edit opens the same form. Changing a template does not change lessons that already have a copy of it.
  • Duplicate makes a copy to adapt — handy for a quiz series with the same settings.
  • Delete removes the template only; lessons keep their copies.

Made something good inside a lesson? Use Save to library in its ⋯ menu to keep it as a template. See Editing a plan.

Lesson plans

What a lesson plan is

Your lesson, prepared in order, one click per step.

A lesson plan is an ordered list of activities for one lesson — say, a warm-up prompt, three quiz questions, a timed speaking task and an exit ticket. During the lesson the plan sits in your control panel and you click each item when its moment comes.

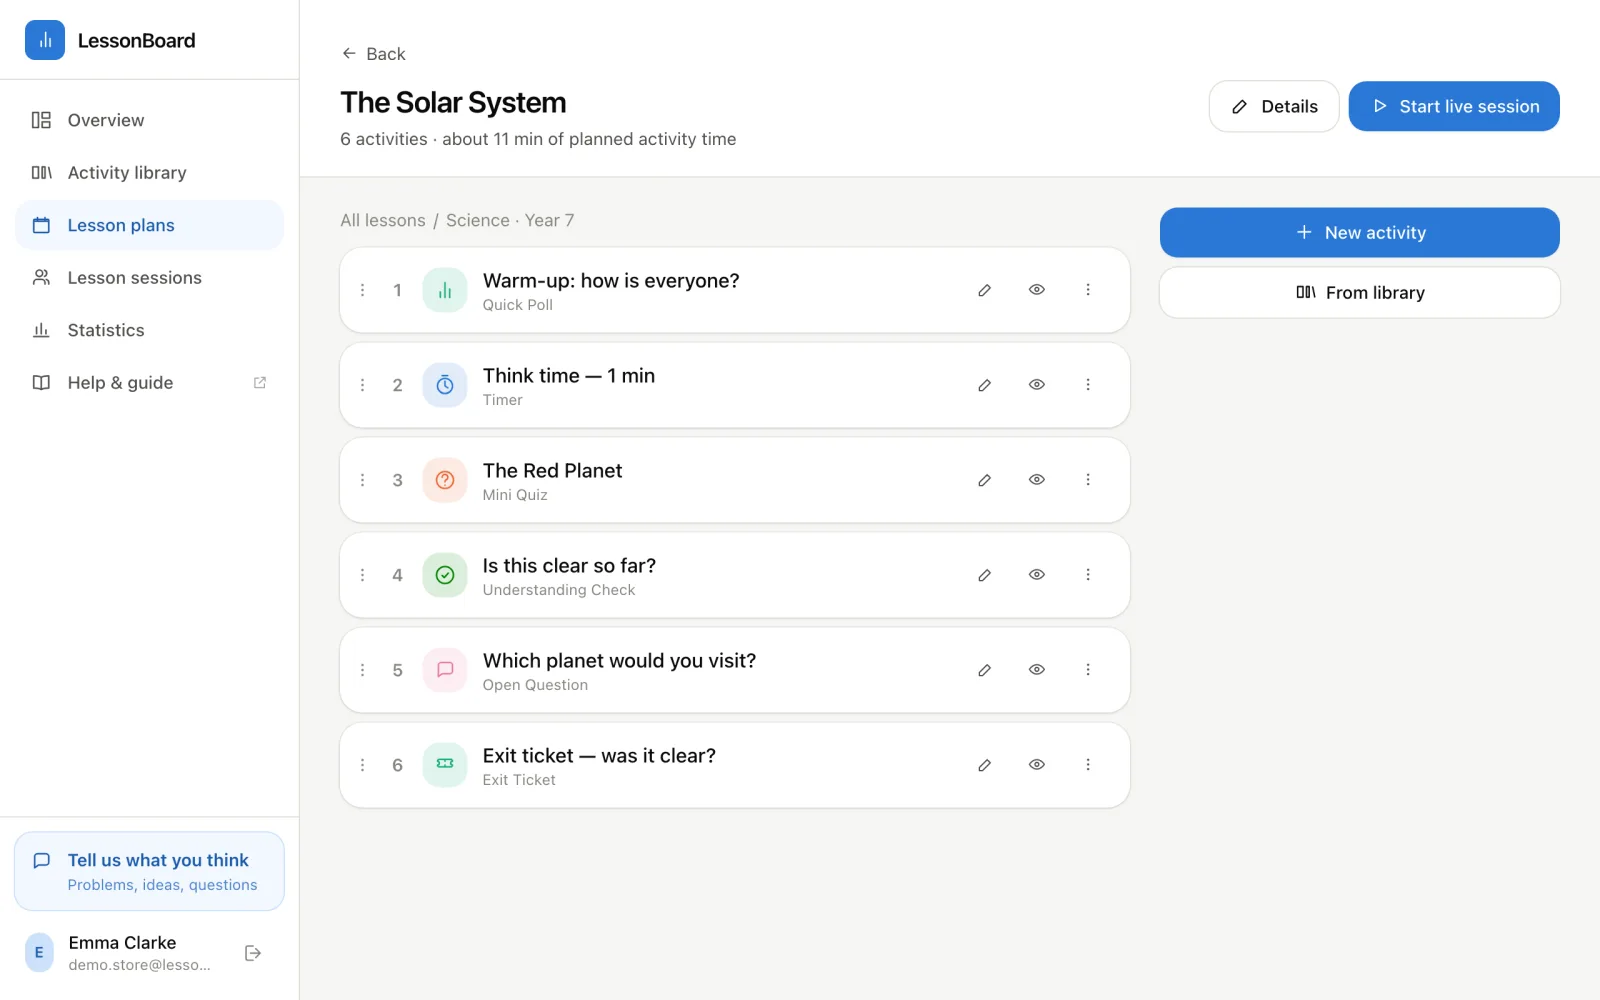
A lesson plan called The Solar System with six numbered activities, each with edit, preview and more buttons; New activity and From library on the right, Start live session at the top

You do not have to follow it strictly: click items in any order, run one twice, or add something that was not planned (see Adding activities mid-lesson). Items you have already shown get a tick.

The plan’s header shows how many activities it holds and roughly how long they take — timers count their duration, everything else about two minutes.

Lesson plans

Creating and organising plans

  1. 1Open Lesson plans and press New lesson.
  2. 2Give it a title. It is created in the folder you have open, and you land in the new plan, ready to add activities.

Folders

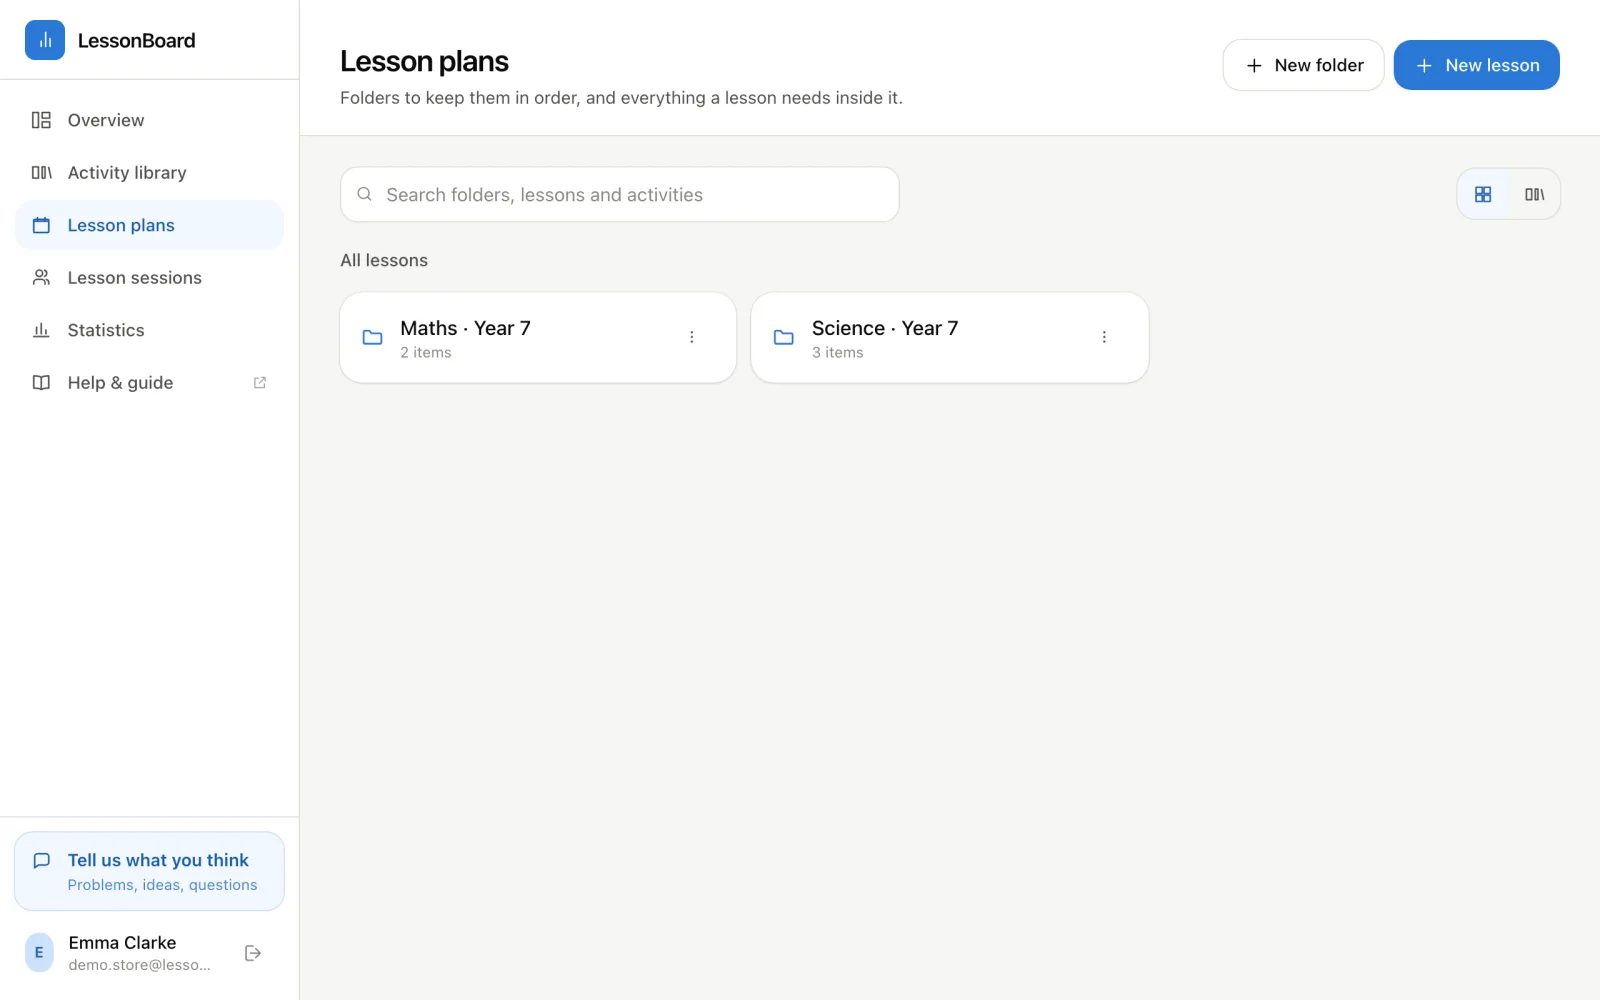
The Lesson plans page showing two folders, Science · Year 7 and Maths · Year 7, with New folder and New lesson buttons
  • Press New folder to group plans — by class, course, level or term. Folders can go inside other folders.
  • Use Move to folder on any plan or folder to re-file it.
  • Rename a folder from its menu. Deleting a folder deletes everything inside it, and you are told how much that is before confirming.
  • Switch between grid and list view with the buttons above the shelf; your choice is remembered.

Search

The search box looks through everything at once — folder names, plan titles and the activities inside plans — so you can find “past simple” without remembering where you filed it.

Lesson plans

Editing a plan

Adding activities

New activity
Pick a type and write it just for this lesson.
From library
Pick a template off your shelf. The lesson gets its own copy, so you can adapt it here without touching the original.

Changing them

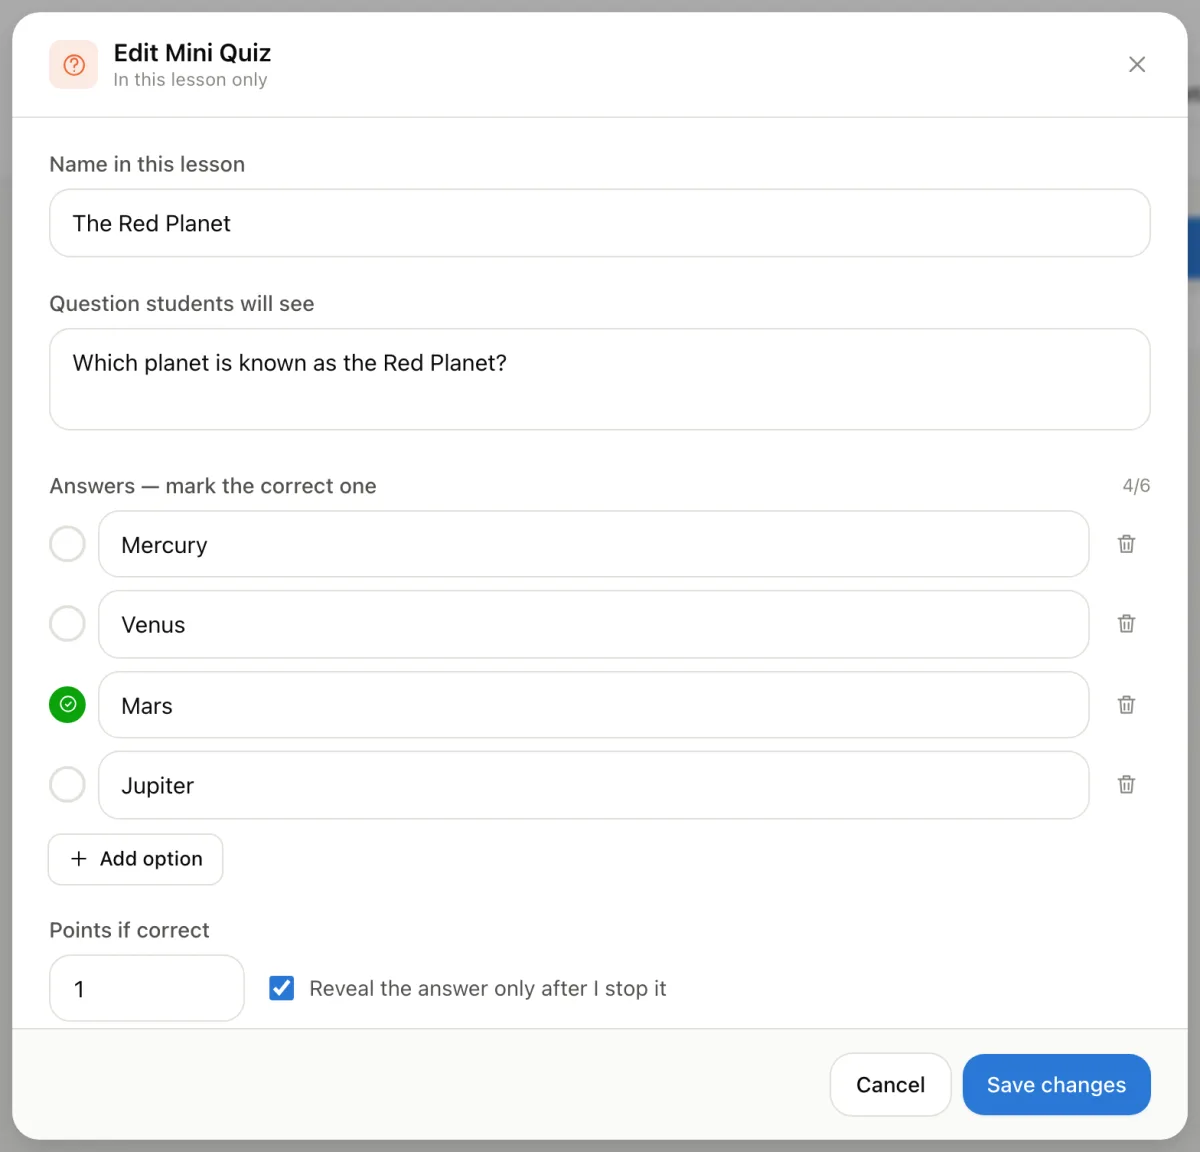
Editing a Mini Quiz: the question, four answers with Mars marked correct, points, and the reveal-after-stop option
Editing an activity inside a plan changes this lesson only.
  • Click an activity (or the pencil) to edit it. Changes apply to this lesson only.
  • Drag the handle on the left to reorder. The ⋯ menu also has Move up and Move down.
  • Preview (the eye) shows it on a phone and on the board.
  • ⋯ → Duplicate puts a copy right below the original.
  • ⋯ → Save to library keeps it as a reusable template. If an identical one is already there, you will see “Already in library” instead of a duplicate.
  • ⋯ → Remove takes it out of this lesson.

Title and notes

Press Details at the top to rename the plan or write notes for yourself — what it covers, which class it is for. Students never see the notes.

Editing a plan never affects lessons that already happened: their results stay exactly as they were.

Running a lesson

Starting a live session

A session is one lesson actually happening.

You can start one from three places:

  • In a lesson plan, press Start live session.
  • On the Overview page, press Start next to any plan.
  • In the extension side panel, pick a lesson from the list — or No lesson plan to launch activities as you go.

Each session gets its own six-character join code. You can have one lesson running at a time, and the dashboard and the extension control the same one: start on the website and open the panel later, and it picks the lesson up.

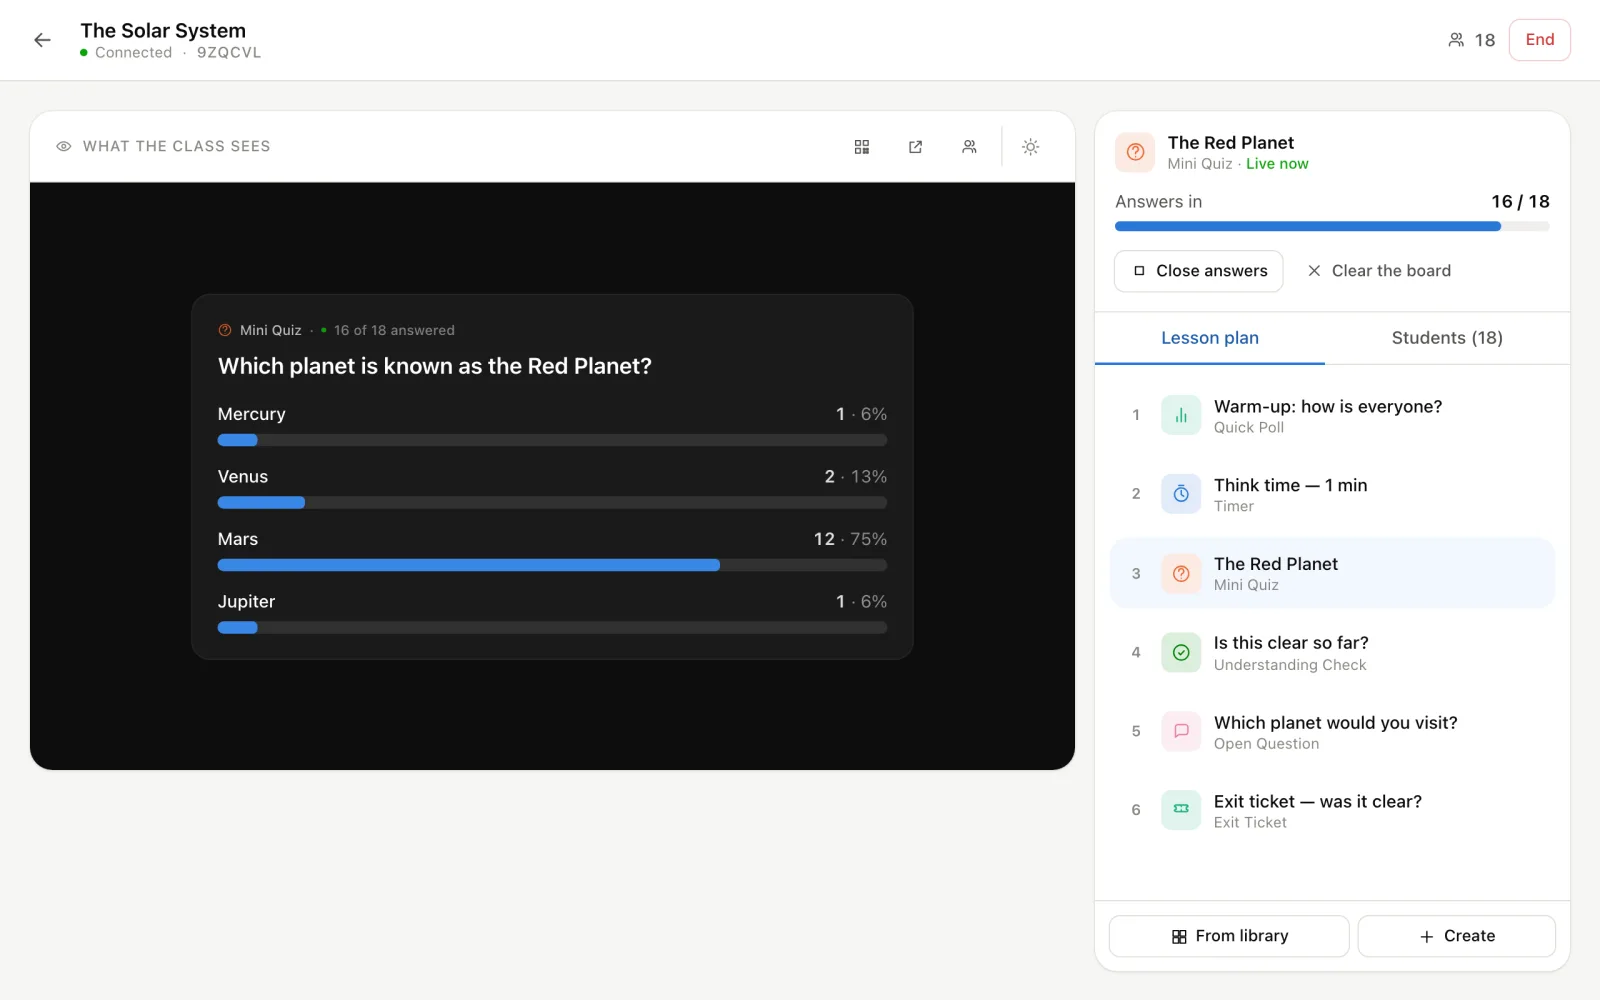
On the website, the live screen has the board on the left (What the class sees) and your controls on the right: the activity that is running, then your Lesson plan and Students tabs.

The live session screen: a Mini Quiz with live result bars on the board on the left; the answer count, controls and lesson plan on the right

Running a lesson

Inviting students

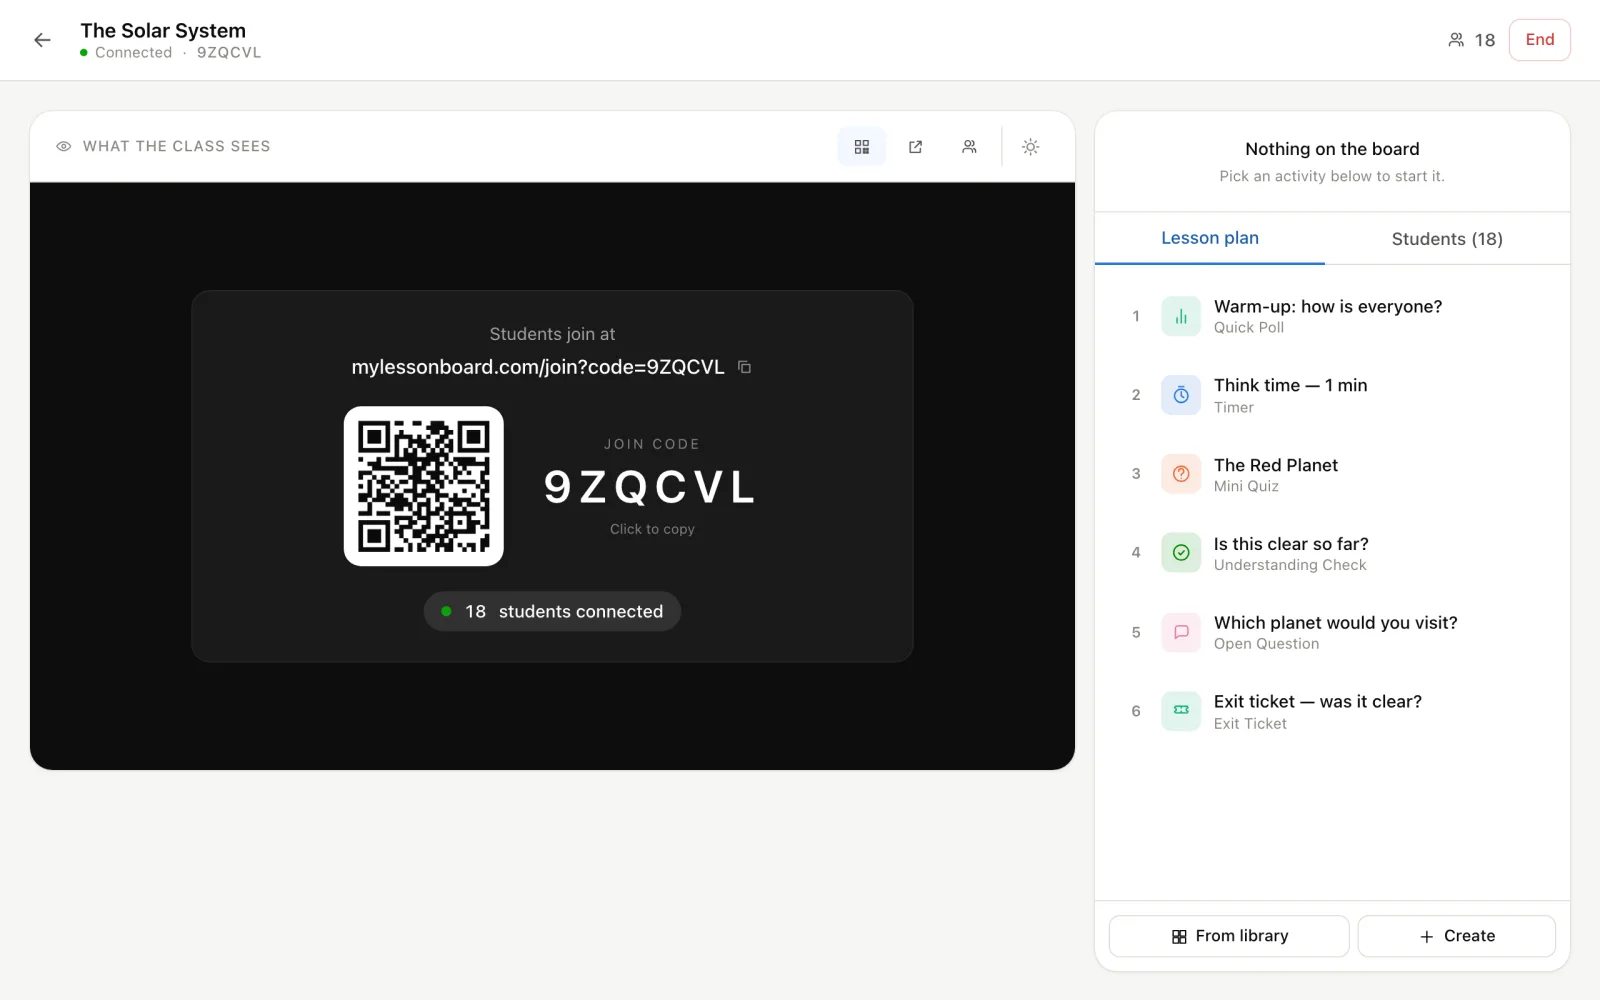
A new lesson opens with the invite on the board: a QR code, the join code and the address. It stays there until you start the first activity.

The board showing the join address, a QR code, the join code and 18 students connected
  • On the website, the QR button above the board puts the invite back on the board at any time. Press it again to return to the activity.
  • In the extension, Invite students shows the code in your camera and gives you a join link to copy into the meeting chat.
  • Students scan the QR, open the link, or go to the site, press join and type the code.
  • If students have the extension too and are in the same Meet, Zoom or Teams call, their panel finds your lesson on its own — no code needed.

The Students tab lists everyone who joined. A green dot means they are connected right now; points appear next to names once they have any.

Running a lesson

Running an activity

Click an item in the plan to put it on the board. Whatever was there before is replaced. The top of the control panel then shows the activity and its controls:

Answers in
For activities that collect answers: how many of the connected students have answered so far.
Close answers
Stops taking answers. Results stay on the board. For a Mini Quiz with “reveal after stop”, this is when the correct answer is shown.
Clear the board
Takes the activity off the board, so the class sees nothing — or the invite, if it is on.
Timer controls
Pause, Resume, Reset and +1 min.
Picker and Scoreboard
Pick a student, New round, and + / − next to each name.

Running an activity again later in the same lesson starts a fresh round of answers. Both rounds are kept.

Running a lesson

Adding activities mid-lesson

For the question you did not plan.

Under the plan, always in reach, are two buttons:

From library
Search your library by name or type, and launch one straight away.
Create
Pick a type and fill in a short form — question and options, a heading, minutes — then launch. In the extension, tick Also save it to my library to keep it for next time.

Neither changes your lesson plan. What you launch this way is listed under Just this lesson with a dashed outline, so you can run it again, and its answers are saved with the session like everything else.

Running a lesson

Where the class sees the board

Pick whichever suits your room — they can all run at once.

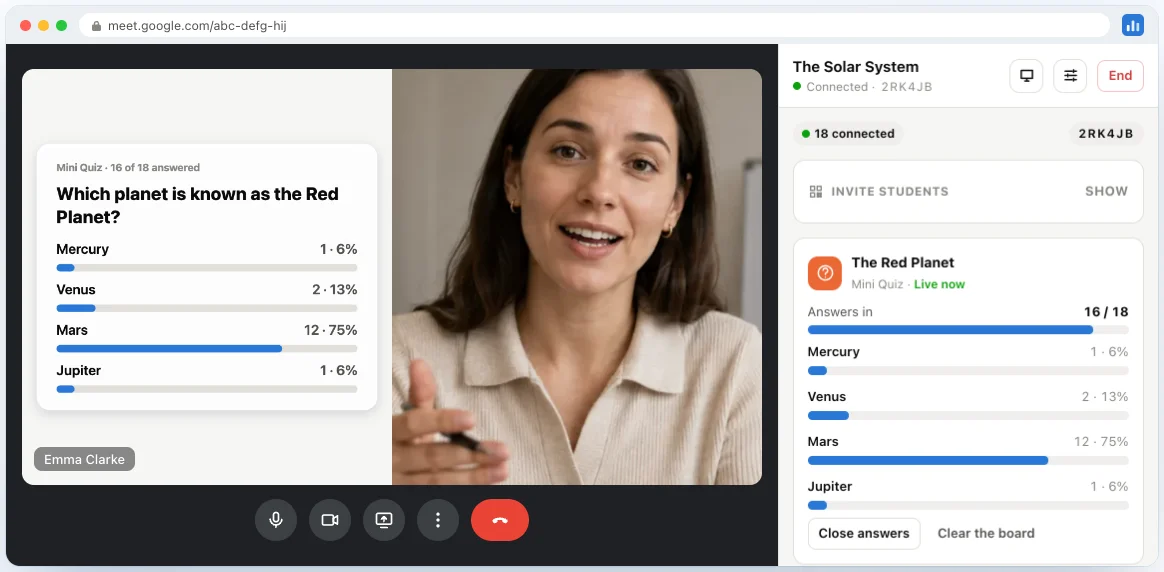
A Google Meet call with the quiz drawn into the teacher’s camera picture, and the LessonBoard side panel open on the right
The board inside the teacher’s camera, as the class sees it in the call.
In your camera picture
With the extension, the board is drawn into your video before the call receives it — Google Meet, Zoom, Teams or any browser-based call. Your video is never sent to us; the drawing happens in your own browser. See Display settings.
In your screen share
Presenting slides? With the extension, starting an activity puts the board on your shared screen, and closing it gives the screen back.
As a shared tab
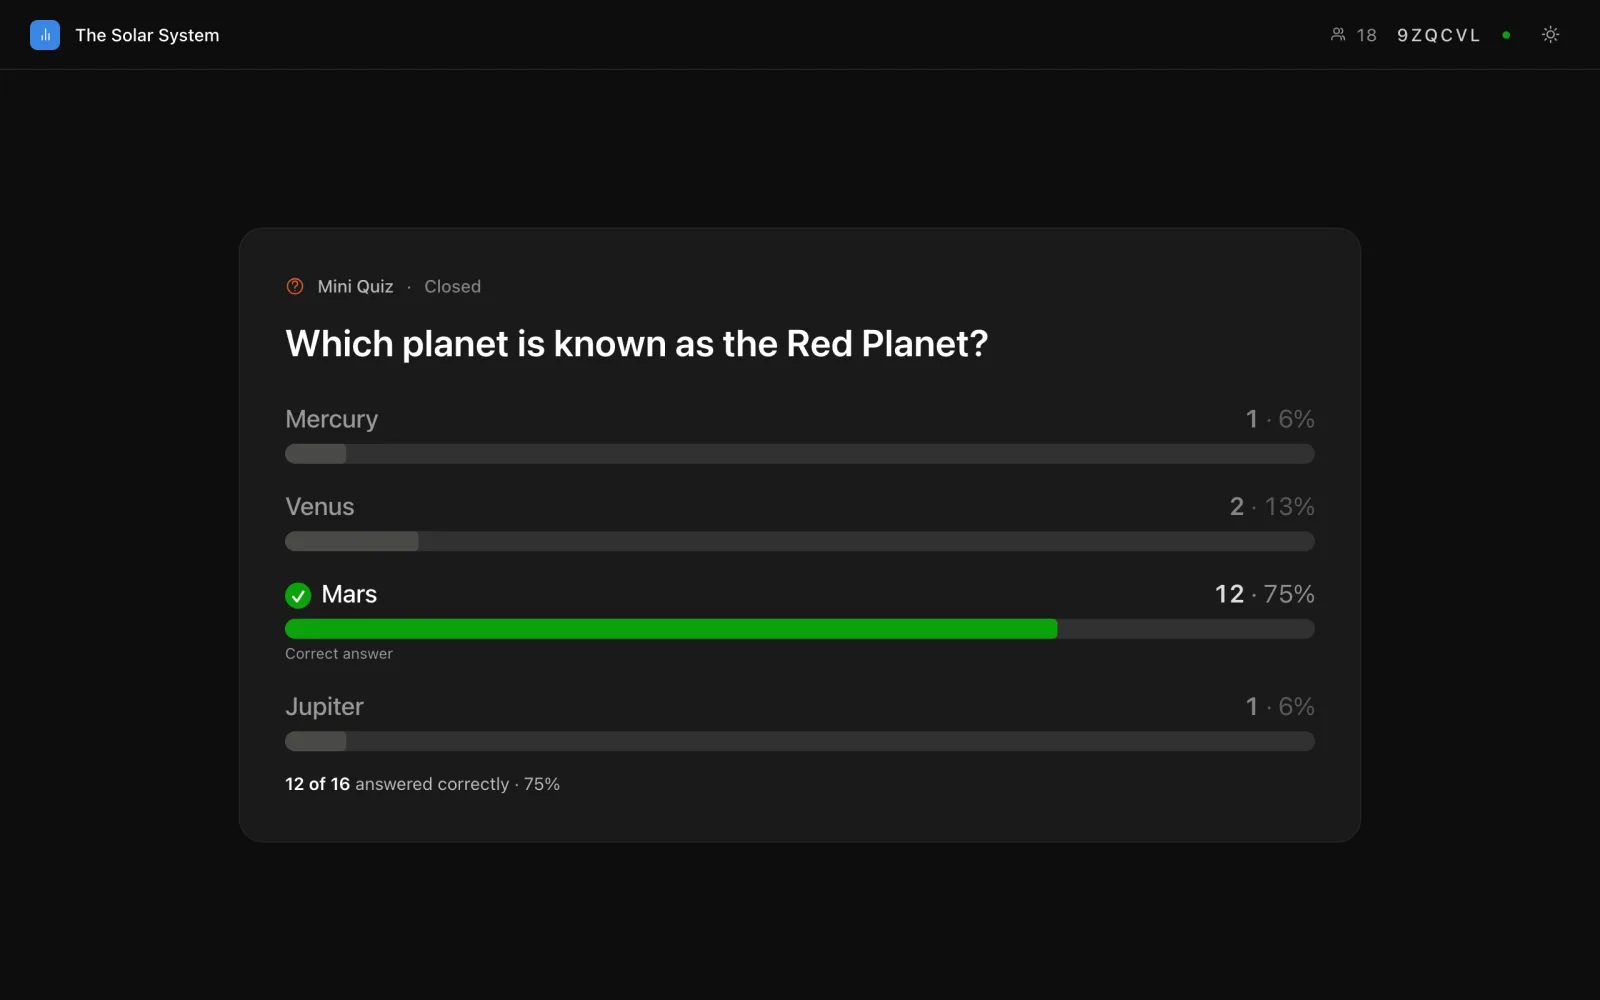
The Open the board page button (on the website above the board, in the extension at the top) opens the board as its own page. Share that tab in your call, or put it on a projector. It has a light/dark switch.
On students’ own screens
Always. Whatever is running shows on every student’s phone with the answer buttons under it — so small text on a shared screen is never a problem.
The board page on its own: a closed Mini Quiz with Mars highlighted as the correct answer
The board page — share this tab in the call, or put it on a projector.

Running a lesson

Ending a lesson

Press End. Students see “Lesson finished”, and everything they answered is saved. You can review it straight away in Lesson sessions.

Closed the laptop without ending? A session with no activity for two hours is ended automatically, with its end time set to when things actually stopped.

Lost the control screen mid-lesson? The Overview page and Lesson sessions both show a running lesson at the top with Back to control.

Chrome extension

Installing and signing in

The remote control that sits beside your call.

The extension works in Google Chrome and other Chromium browsers (Edge, Brave, Arc) — version 116 or newer.

  1. 1Install LessonBoard from the Chrome Web Store. The Overview page of your dashboard has the link.
  2. 2Pin it: click the puzzle-piece icon in the toolbar and the pin next to LessonBoard.
  3. 3Open your meeting tab, then click the LessonBoard icon. The side panel opens on the right.
  4. 4Choose I’m a teacher. If you are already signed in on the website, the panel signs in by itself; if not, it sends you to the site to sign in once. Signing out of the website signs the panel out too.

Installed or updated the extension while a meeting was already open? Reload the meeting tab and turn your camera on again. Meeting apps take the camera when they load, and the extension can only draw on a camera it saw being opened. The panel warns you and offers a reload button when this happens.

Chrome extension

The side panel

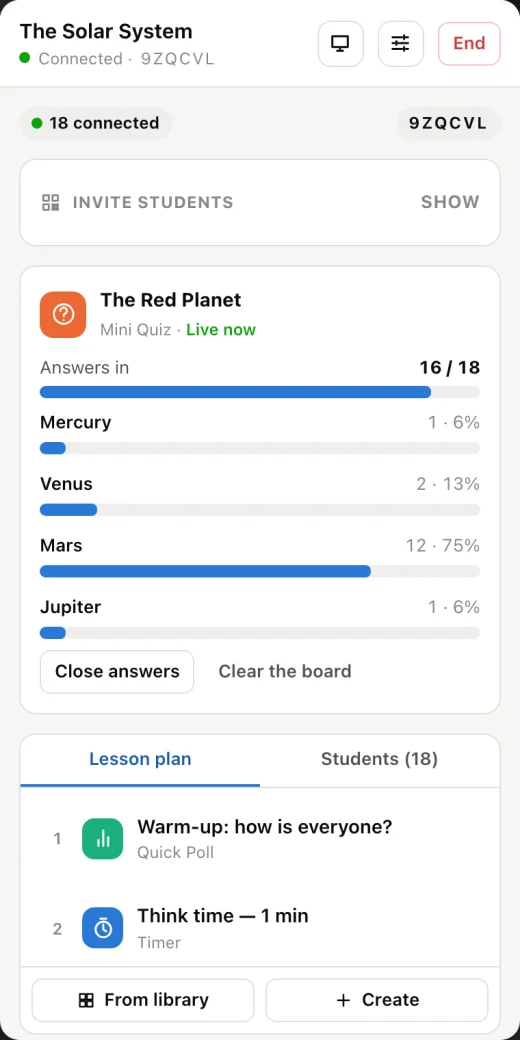
The extension side panel during a lesson: connected students, Invite students, the running Mini Quiz with results, and the lesson plan
The side panel during a lesson.

Before a lesson, the panel lists your lesson plans — with folders and a search box — plus No lesson plan at the top for a lesson run entirely on the fly. Pick one and start.

During a lesson, from top to bottom:

Top bar
The lesson title and join code, Open the board page, Settings (the gear) and End.
Connected
How many students are in the lesson right now.
Invite students
Shows or hides the QR and join code in your camera, and the join link to paste in the chat.
The running activity
Its controls and live results — the same as on the website. See Running an activity.
Lesson plan / Students
Click a plan item to launch it; ticks mark what you have already shown. From library and Create sit underneath.

The panel and the website control the same lesson. You can start on one and continue on the other — for instance, prepare the board on a big screen and run it from the panel.

Chrome extension

Display settings

How the board looks in your video. Open them with the gear.

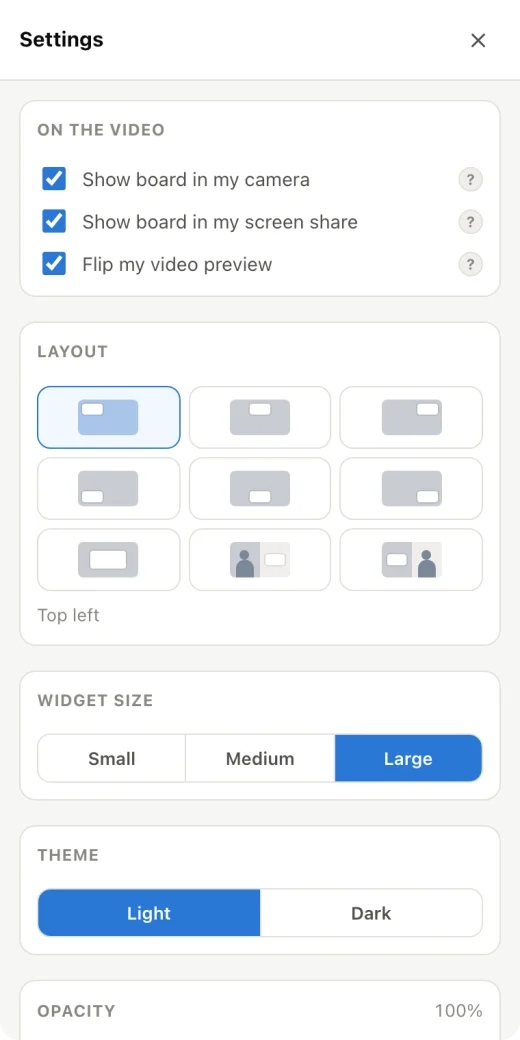
The extension settings: switches for camera, screen share and preview flip; a grid of nine layouts; widget size, theme and opacity
Show board in my camera
Draws the running activity into your outgoing video. Turn it off to keep the board on your panel only — for example while setting something up before class.
Show board in my screen share
While you share a screen, starting an activity puts the board on it and stopping it gives the screen back — made for presenting slides. Independent of the camera switch, and can be changed mid-share.
Flip my video preview
Meeting apps mirror your self-view, which makes the board’s text look backwards to you — it is the right way round for the class. This flips only your own preview. Turn it off if your preview ends up doubly flipped.
Layout
Any of six corners; Board only, camera hidden — the class sees just the board while an activity runs, and your picture returns when it ends; or you on one side, board on the other — your camera is cropped to its middle half, so stay near the centre of the frame. For slides in a screen share, Board only looks sharpest.
Widget size
Small, Medium or Large.
Theme
Light or Dark.
Opacity
50–100% — lower lets more of your video show through.

Settings are saved to your account, so they are the same on any computer you sign in from.

Chrome extension

Students with the extension

Students do not need the extension — the phone page is enough. But on a laptop, a second device can be a nuisance, so students can install the same extension:

  1. 1Install LessonBoard and open the side panel in the meeting tab.
  2. 2Choose I’m a student.
  3. 3If you are in the same Meet, Zoom or Teams call, the panel finds the lesson — just type a name. Otherwise it asks for the six-character code.
  4. 4Answer in the panel, beside the call.

Chrome extension

When the board does not appear

The class cannot see the board, but I can
Reload the meeting tab and turn the camera back on — the meeting opened your camera before the extension was ready. See Installing and signing in.
Nothing shows in the camera at all
Check Show board in my camera is on in Settings, that an activity is actually running (not cleared), and that the lesson is running in this tab’s meeting.
The text looks backwards to me
That is your mirrored self-view — the class sees it correctly. Turn on Flip my video preview.
I use the desktop Zoom app
The extension only reaches calls in the browser. Use Zoom in the browser, or open the board page and share that window.
The board covers my face
Change the Layout, or make the widget smaller.

After the lesson

Lesson sessions and results

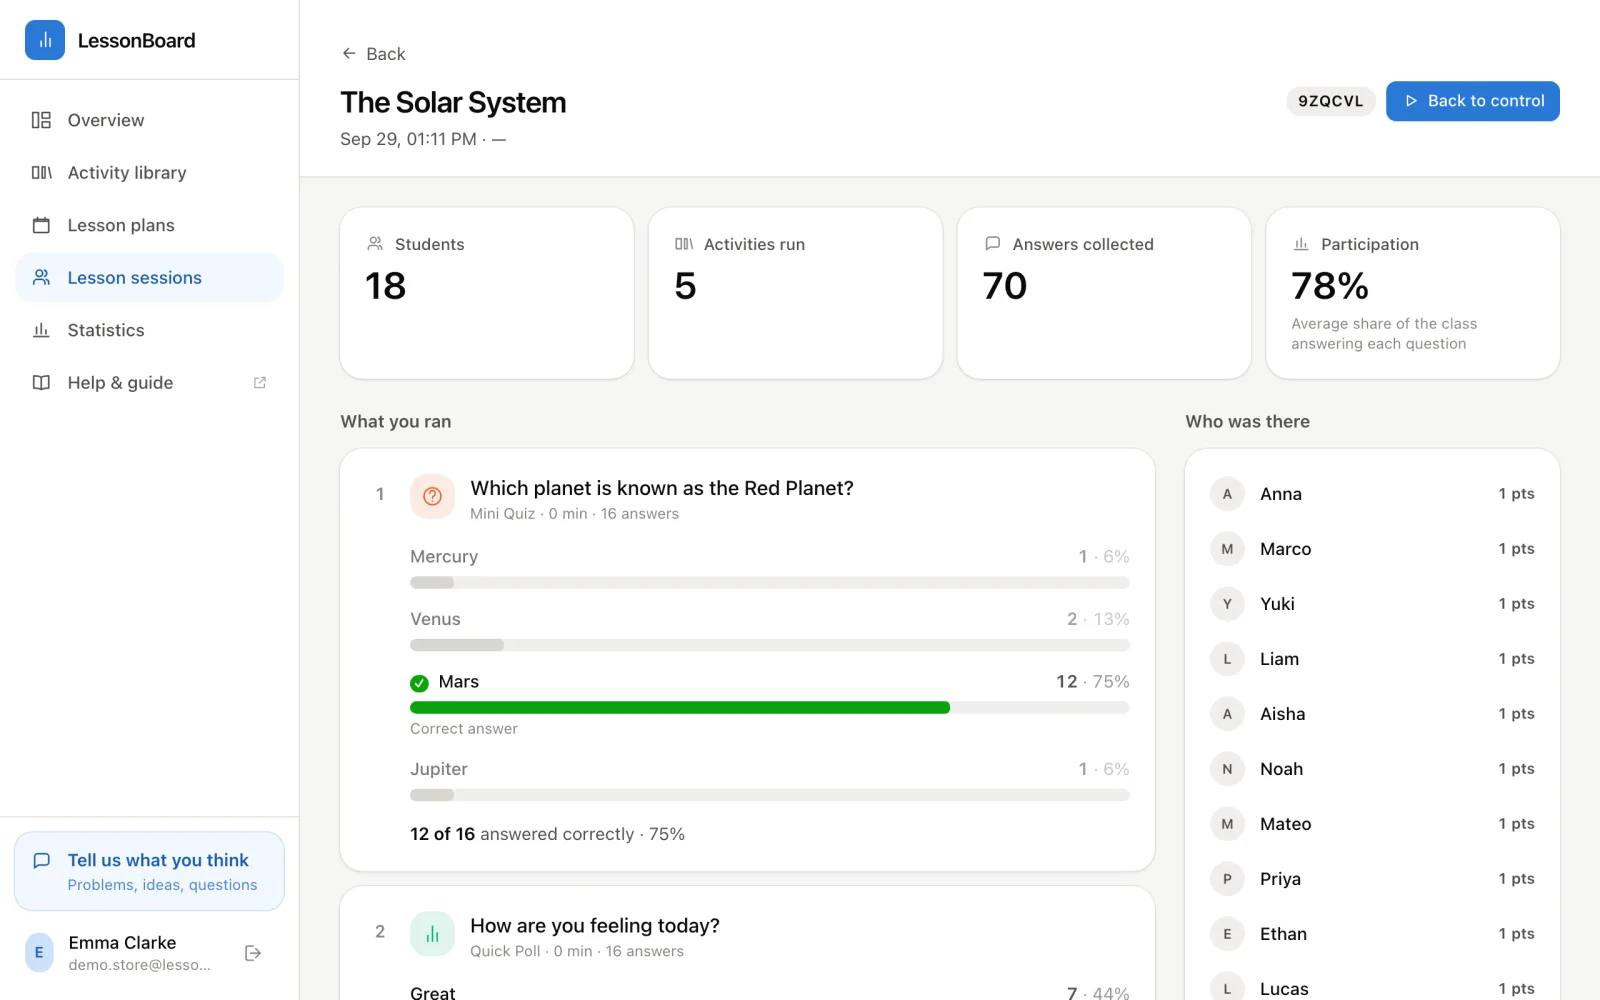
Lesson sessions lists every lesson you have run, newest first, with any running one at the top. Open one to see:

  • Students, activities run, answers collected and participation — the average share of the class that answered each question.
  • What you ran, in order, with every answer: poll and quiz results, written answers, ratings.
  • Who was there, with their points.

Deleting a session removes it and all its answers for good.

A session’s results: tiles for students, activities run, answers collected and participation; each activity’s results below, and the students with their points

After the lesson

Statistics

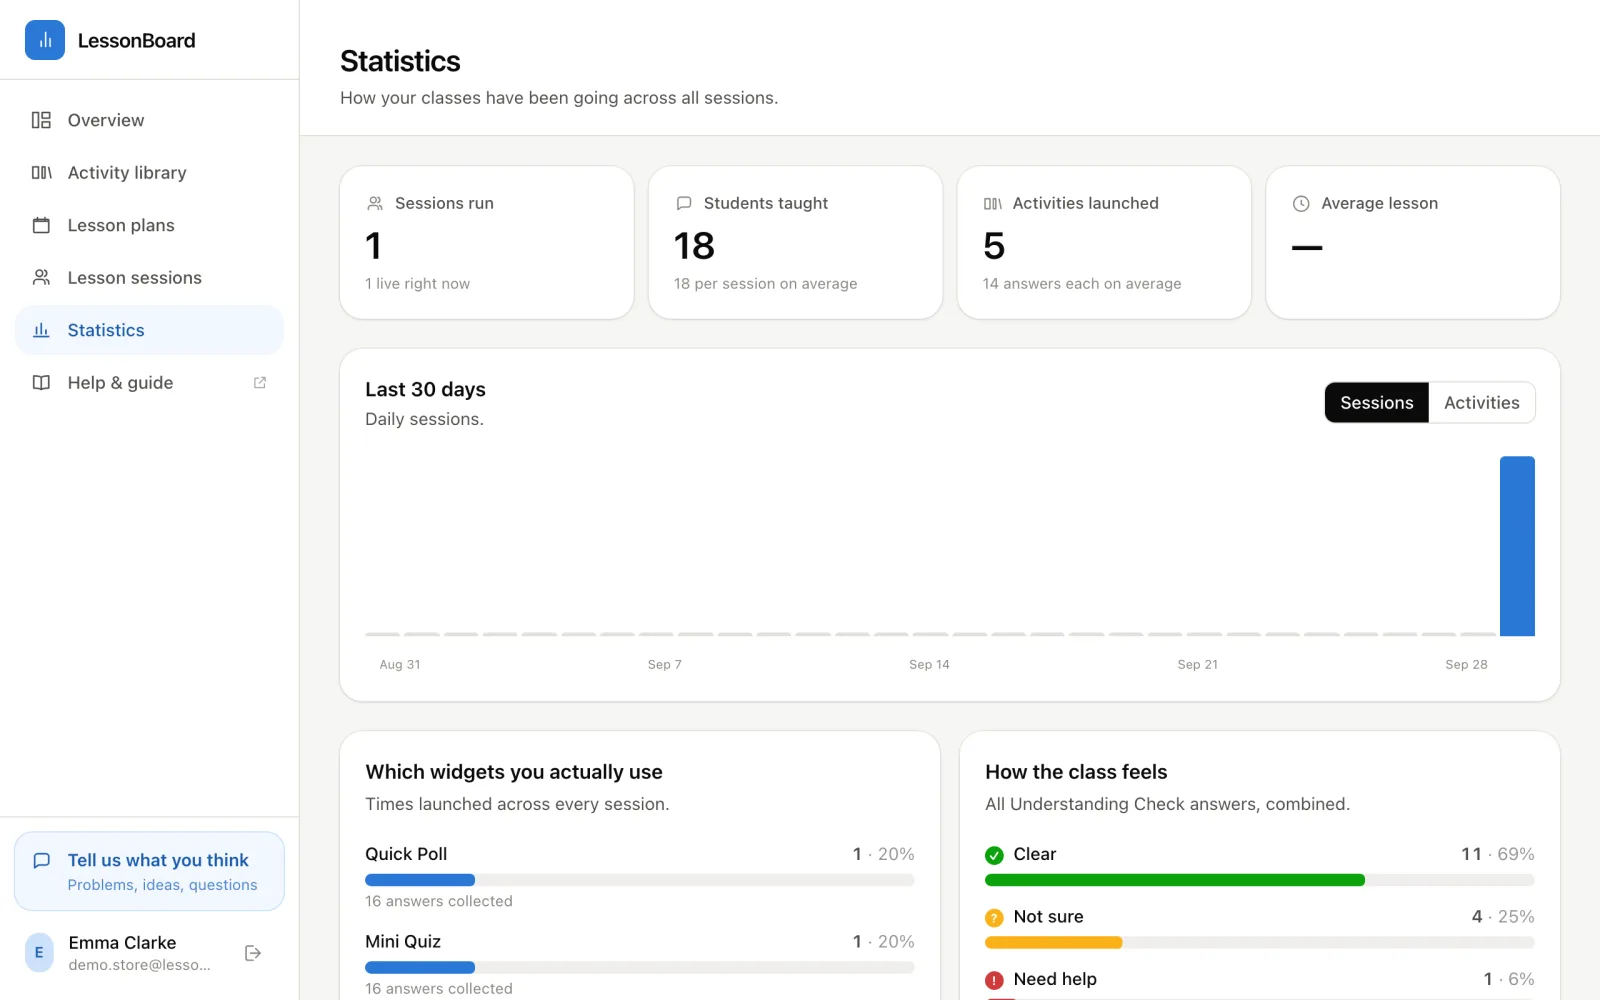
The Statistics page adds up every session:

  • Sessions run, students taught, activities launched, and the length of an average lesson.
  • Your activity over the last 30 days.
  • Which activity types you actually use.
  • How the class feels — all your Understanding Check answers combined.
  • Quiz accuracy across every Mini Quiz you have run.
The Statistics page: totals for sessions, students, activities and lesson length, a 30-day chart, and which activity types are used most

For students

Joining a lesson

Nothing to install, no account.

  1. 1Scan the QR code your teacher shows, open the link they send, or go to mylessonboard.com/join and type the six-character code.
  2. 2Type your name and press join.
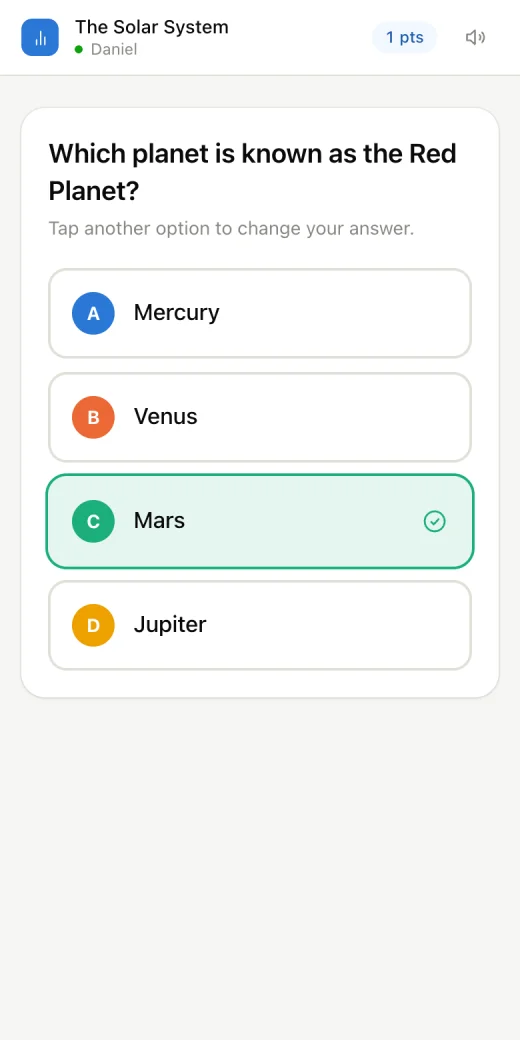
  3. 3Keep the page open. Whatever your teacher starts appears on it — tap an answer, or type one and send it.
The student join page on a phone, asking for the student’s name
Joining: just a name.
A Mini Quiz on a student’s phone with four large answer buttons
Answering on the phone.

If your connection drops, reopen the same link on the same device — you come back as the same person, with your points. When the teacher ends the lesson, the page says so.

Still stuck?

Tell us what you were trying to do — signed in, use Tell us what you think in the dashboard, or write to us from the contact page. A question here usually means this guide is missing something.