How LessonBoard works

Four pieces, one live session, and several ways to put the board in front of your class. Here is the whole picture.

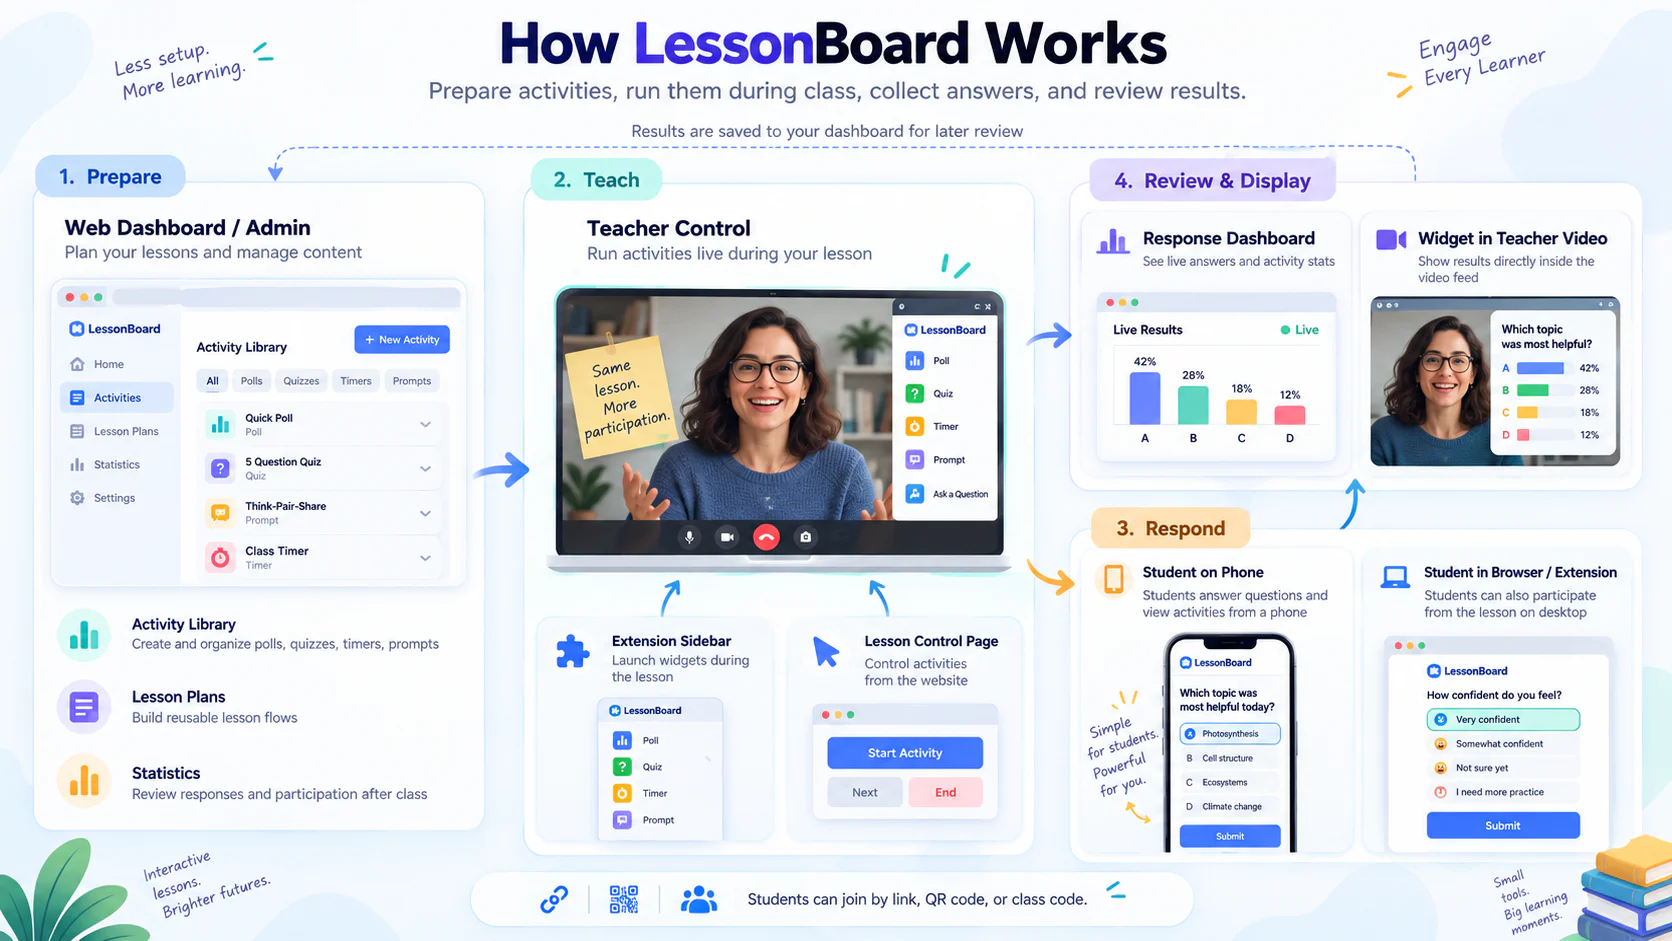
A four-step diagram. One, Prepare: a web dashboard where a teacher builds an activity
                 library and lesson plans. Two, Teach: a video call with the LessonBoard side panel open,
                 launching activities into the lesson. Three, Respond: students answering on a phone or in
                 their own browser. Four, Review and display: a live results dashboard, and the same results
                 drawn inside the teacher's video. Students join by link, QR code or class code.
The whole service on one page. Open it full size — the detail is easier to read on a small screen that way.

The four pieces

The Chrome extension

Your browser, next to the call

A side panel you open in the tab where your lesson is happening. It is the remote control: start an activity, watch answers arrive, stop it, move on. It also draws the board into your camera picture.

The dashboard

mylessonboard.com

Where you prepare: build activities, arrange them into lessons, and read what the class answered after the bell. You can also run a whole lesson from here if you would rather not use the extension.

The LessonBoard service

Our server

Holds your library and keeps everyone in step. When you start an activity it reaches every student in the session within a moment, and their answers come back the same way.

The student page

Any phone browser

Students open a link or type a six-character code. No account, no install, no app store. They pick a name and start answering.

How they connect

You control the lesson on the left. The service in the middle keeps everyone in step. The class sees the board on the right — in your video, in a shared tab, or on their own phone.

You

Extension side panel

Dashboard

Start, stop and step through activities.

what to show

LessonBoard

Live session

  • Your saved activities and lessons
  • Who is in the room right now
  • Every answer, kept for afterwards
answers back

Your class

Phone browser

Or the same extension

A code or a link. No account, nothing to install.

and the board appears…

Inside your camera picture

The extension composites the board into your webcam feed before the call sees it, so the widget travels with your video into Meet, Zoom, Skype or anything else in the browser.

Your video is never uploaded to us — the drawing happens in your own browser.

A shared tab

The board also exists as an ordinary web page. Open it from the panel and share that tab with your conferencing tool’s screen share.

Useful when you want the board big, or your camera off.

On their own phone

Whatever is running is on the student’s screen anyway, with the answer buttons underneath it.

This is what makes small text on a shared screen a non-issue.

Your video stays on your machine. The extension paints the board onto your camera picture inside your own browser and hands the result to the call. We never receive your video or audio, and we are not in your meeting.

Four ways teachers run it

The same session works in all of them. Pick whichever matches your room.

The usual setup

You use the extension, students answer on their phones

  1. 1 Open your meeting, open the LessonBoard panel, start the session.
  2. 2 Press Invite — a join code appears in your video and the link appears in the panel for you to paste in the chat.
  3. 3 Students scan or type the code on their phone and enter a name.
  4. 4 Everything you start shows in your camera picture and on their phones at the same time.

Best for: One-to-one and small group lessons where students already have a phone next to them.

Both sides installed

You use the extension, students use it too

  1. 1 Students install the same extension and open the side panel in the meeting tab.
  2. 2 Because the panel can see which meeting the tab is, it finds your session on its own — no code to type.
  3. 3 They read the activity and answer in the panel, beside the call.
  4. 4 You still see everything on the teacher side exactly as before.

Best for: Regular groups on a laptop, where a second device is a nuisance.

No camera needed

You share the board through the video call

  1. 1 Start the session and open the board page from the panel, or from the dashboard.
  2. 2 Share that browser tab with your conferencing tool the way you share any other.
  3. 3 Run activities from the panel or the dashboard; the shared tab follows along.
  4. 4 Students answer on their phones as usual.

Best for: Big classes, or lessons where your camera is off and screen share is already open.

Offline classroom

A room, a projector and phones

  1. 1 Put the board page on the projector or the classroom screen.
  2. 2 Keep the controls on your own laptop or in the extension panel.
  3. 3 Students join from their phones with the code on the wall.
  4. 4 Answers land on the big screen as they come in.

Best for: Ordinary classroom teaching — the same activities, no video call involved.

Want to see the widgets themselves?

Nine of them, and each one has a moment in the lesson where it earns its place.